Achieving that perfectly sharp crease on your trousers or a crisp pleat on a shirt can often feel like a battle reserved for the ironing board. While garment steamers excel at effortlessly banishing wrinkles and refreshing fabrics, many users find themselves wondering if they can truly replicate the precision of an iron. The good news is, with the right technique and your steamer’s crease attachment, you absolutely can! This specialized accessory is designed to help you create defined lines, elevating your garment care routine from wrinkle-free to impeccably pressed. Understanding how to use this tool effectively can save you time and preserve the integrity of your clothes, offering a gentle yet powerful alternative to traditional ironing methods.
Understanding Your Garment Steamer’s Crease Attachment
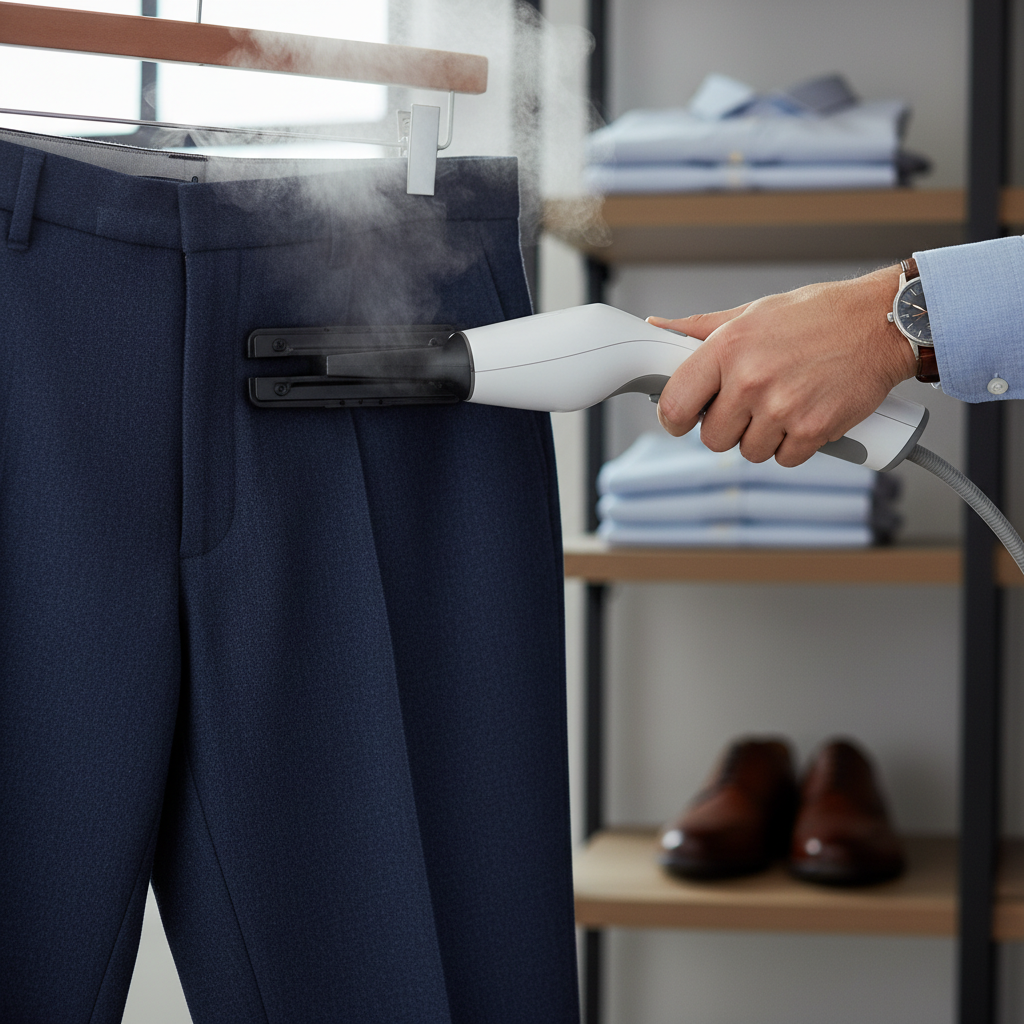
A garment steamer’s crease attachment is a handy accessory, often a clip or a set of flat plates, that fits over the steam nozzle. Its primary purpose is to compress fabric while applying steam, allowing you to create sharp, defined creases similar to those achieved with a traditional iron. Unlike the broad, smoothing action of a regular steamer head, this attachment focuses the steam and provides the necessary pressure to set a crisp line into the fabric.
Crease attachments come in various forms, including removable clips that snap onto the nozzle or integrated designs found on some steamer models. While general steaming relaxes fabric fibers to release wrinkles, the crease attachment uses concentrated steam and physical pressure to realign and flatten those fibers into a distinct fold. This targeted approach makes it invaluable for details like pant creases, shirt sleeves, or even sharp pleats on skirts, providing a level of finish that standard steaming alone often cannot match.
Preparing for Perfect Creases: Pre-Steaming Checklist
Before you begin creating crisp creases, proper preparation is key to ensuring efficiency and protecting your garments. A few simple steps can make a significant difference in the outcome.
First, always fill your steamer’s reservoir with distilled water. This prevents mineral buildup, which can prolong the life of your appliance and prevent unsightly water spots on your clothing. Next, if your steamer has a removable crease attachment, ensure it is securely fitted onto the nozzle before you power on the device and allow it to heat up. Attaching it after the steam has started generating can be difficult and potentially unsafe.
Once the steamer is ready (usually indicated by a light or a steady flow of steam), it’s wise to let it run for about a minute. This “pre-steaming” allows any residual water in the hose to clear, ensuring a consistent, powerful stream of dry steam and preventing initial sputtering that could dampen your garment unevenly. Lastly, take a moment to prepare your garment. Hang it tautly on a sturdy hanger, or position it on a flat, heat-protective surface if your technique requires it. Always check the fabric care label beforehand to confirm it’s suitable for steaming, especially with direct pressure.
Step-by-Step Guide: Using the Crease Attachment Effectively
Mastering the crease attachment requires a methodical approach, focusing on fabric positioning, proper attachment application, and a consistent steaming technique.
Positioning the Garment
|
Our Picks for the Best Standing garment steamer in 2026
As an Amazon Associate I earn from qualifying purchases.
|
||
| Num | Product | Action |
|---|---|---|
| 1 | Upright Steamer for Clothes 1350W Turbo Boiler Standing Garment Steamer 1.6L Water Tank 1h Continuous Steam Flat&Hanging Ironing Double Retractable Rod 10 Modes 30s Fast Preheat for all Fabrics |

|
| 2 | SALAV GS18 Full-Size Clothes Steamer - 1500W Power, 1.8L Water Tank, 60-Min Garment Steam, Iron Clothing, Adjustable Pole & Wheels for Easy Storage, Professional Standing Steamer for Clothes, White |
|
| 3 | SALAV GS18-DJ Standing Garment Steamer with Roll Wheels for Easy Movement, 1.8L Water Tank for 1 Hour Continuous Steaming, Adjustable Pole for Storage, Includes Descaler Packet, 1500 watts |
|
| 4 | Garment Steamer for Clothes Standing, 1500W Efficient Clothes Steamer Standing with Wheels, Professional 58OZ Water Tank for Continuous Steaming, Fast Heating Wrinkle Remover |
|
| 5 | True & Tidy Heavy Duty Commercial Full Size Standing Garment Steamer for Clothes with Extra Large 3L (101 oz) Water Tank for 90+ mins of Steam Time, 1800 watts of Powerful Steam, 3 Settings, Gray |
|
| 6 | Pure Enrichment PureSteam XL Standing Fabric Steamer - Professional Wrinkle Remover Heats in 45 Seconds; 1/2-Gallon Tank for 1 Hour of Steaming; Easy-Roll Wheels, Garment Hanger, & Fabric Brush |
|
| 7 | SALAV Heavy Duty Commercial Full-Size Garment Steamer with Foot Pedals and Extra Large 3L (101.5 oz) Water Tank, 1800 watts, 90+min of Continuous Steam (White) |
|
| 8 | Jiffy Steamer J-2000 Jiffy Garment Steamer with Plastic Steam Head, 120 Volt, Beige |
|
| 9 | SALAV Heavy Duty Commercial Full-Size Garment Steamer with Foot Pedals and Extra Large 3L (101.5 oz) Water Tank, 1800 watts of Poweful Steam (Navy) |
|
| 10 | SALAV® Heavy Duty Smart Auto Shut-off Commercial Full-Size Garment Steamer, Beeping Alert when Water Runs out, Foot Pedal Control, XL 3L (101.5 oz) Tank, 1800 watts, 90+min of Continuous Steam, Navy |
|
Correct garment positioning is fundamental for creating sharp creases. For items like trousers, hang them by the cuffs to allow gravity to pull the fabric straight, making it easier to identify and align the natural crease lines. For shirts or other garments, a sturdy hanger works best. If your steamer’s attachment or technique requires pressing against a surface, consider using a heat protection glove or placing a heat-resistant mat underneath the fabric to provide firm support and protect your hand or surfaces. The goal is to maintain maximum tension and a flat surface where the crease will be formed.
Applying the Attachment
With your garment securely positioned and the steamer ready, hold the steamer head upright to prevent water from collecting and spitting. If your crease attachment has a clip, gently slide the section of fabric where you want the crease to form underneath the clip, ensuring the fabric is held taut and precisely aligned within the attachment. For models that rely on pressing, firmly bring the crease attachment down onto the fabric, sandwiching the material to create the desired line. The key is to apply consistent, even pressure as you move the steamer.
Steaming Technique for Sharp Creases
Once the fabric is secured and under tension within the crease attachment, activate the steam. The technique for sharp creases differs slightly from general wrinkle removal:
- Slow, Deliberate Strokes: Unlike the quick passes for de-wrinkling, use slow, steady strokes along the intended crease line. Moving too quickly will not allow the steam and pressure enough time to set the crease effectively, and wrinkles may reappear.
- Work Section by Section: For longer items like pant legs, work in manageable sections, aligning the attachment carefully with the previously formed crease as you move down the garment.
- Maintain Consistency: Ensure a continuous flow of steam throughout the process. Avoid lifting the attachment too frequently, as this can disrupt the forming crease.
By following these steps, you’ll find that your crease attachment transforms from a simple accessory into a powerful tool for achieving perfectly pressed garments.
Achieving Professional Results: Advanced Tips and Tricks
To truly elevate your steaming game and consistently achieve professional-grade creases, consider these advanced tips, including understanding fabric suitability and post-steaming care.
When it comes to fabrics best suited for crease attachments, natural fibers like cotton, linen, and wool, along with various synthetic blends, respond exceptionally well to this targeted steaming method. These materials tend to hold creases effectively once set with heat and pressure. However, it’s crucial to approach delicate fabrics like silk or chiffon with caution. While these can often be steamed to remove wrinkles, directly clamping them with a crease attachment might be too aggressive. For such materials, it’s often best to maintain a slight distance between the attachment and the fabric, relying more on the concentrated steam to help define the line gently, or to use a handheld steamer with a heat-protective glove behind the fabric to create a soft press.
Conversely, there are fabrics to avoid using with a steamer’s crease attachment entirely. Materials such as suede, leather, and waxed jackets can be easily damaged or even melted by direct steam and pressure. For these items, professional cleaning or specialized care methods are always recommended.
The principles of gravity and tension are your allies when steaming for creases. Always ensure your garment is hanging or positioned tautly. For pants, hanging them by the cuff allows gravity to naturally pull the fabric, making it easier to align the existing or desired crease. This tension, combined with the attachment’s pressure, helps lock the crease into place. Finally, post-steaming care is vital. After creating your creases, allow the garment to cool and dry completely on its hanger before wearing or storing it. This crucial step lets the fabric fibers set in their new, crisp form, ensuring the crease lasts longer. Rushing this can lead to the crease relaxing and wrinkles returning.
Common Mistakes and Troubleshooting
Even with the best intentions, encountering issues when using a crease attachment is common. Recognizing and addressing these can help you achieve consistently sharp results.
One frequent problem is water sputtering or dripping from the steamer nozzle. This often occurs if the steamer hasn’t fully heated up before use or if it’s tilted too far forward. Always allow your steamer to reach its full operating temperature and clear any initial sputtering before applying it to your garment. Holding the steamer upright also minimizes the chance of water leakage. If creases are not as sharp as desired, several factors could be at play. You might be moving the steamer too quickly, not applying enough pressure with the attachment, or the fabric type might be inherently resistant to sharp creases (e.g., some very soft blends). Try slowing your strokes, ensuring continuous and firm contact, and checking if the fabric is suitable for strong creasing.
Water marks on your garment can be frustrating. This usually happens when the nozzle is held too close to delicate fabrics, or if the steamer is not fully heated, causing water droplets to mix with the steam. To prevent this, maintain a slight distance from delicate materials and ensure your steamer is generating consistent, dry steam. Regularly cleaning your steamer to prevent mineral buildup can also help avoid residue that might cause marks. By being mindful of these common pitfalls and adjusting your technique, you can overcome challenges and achieve pristine, professional-looking creases with confidence.
Conclusion
Mastering your garment steamer’s crease attachment is a straightforward path to achieving impeccably sharp lines and a polished look without the fuss of a traditional iron. By understanding its purpose, preparing your garments diligently, and applying a careful, deliberate technique, you can transform your everyday clothing into crisply pressed attire. Remember the importance of fabric suitability, the power of tension, and the final step of allowing garments to cool and set. With a little practice, your steamer’s crease attachment will become an indispensable tool in your quest for a flawless wardrobe. Why not experiment with your crease attachment today and discover the satisfying difference it makes in your garment care routine?
Frequently Asked Questions
Can I use the crease attachment on all types of fabric?
No, while it works well on cotton, wool, linen, and many synthetics, delicate fabrics like silk or chiffon require caution. Avoid using it on suede, leather, or waxed materials as they can be damaged by steam and pressure.
How do I prevent water spots when using the crease attachment?
Ensure your steamer is fully heated and generating consistent steam before use. Hold the steamer upright and avoid tilting it. For delicate fabrics, maintain a slight distance to prevent direct water contact. Using distilled water can also minimize mineral deposits.
Is a garment steamer’s crease attachment as effective as an iron for sharp creases?
While a traditional iron often provides the sharpest, most long-lasting creases due to direct heat and heavy pressure, a steamer’s crease attachment can achieve very good, crisp results, especially for maintenance and quick touch-ups, with less risk of scorching.
Should I press hard with the crease attachment?
Apply consistent, firm pressure to compress the fabric, but avoid excessive force that could stretch or damage the material. The goal is even contact to allow the steam and gentle pressure to set the crease.
Why are my creases not holding after steaming?
Creases might not hold if the steamer was moved too quickly, insufficient pressure was applied, or the garment was not allowed to cool and dry completely after steaming. Ensure the fabric is taut and the technique is slow and deliberate.