Discovering mold in your water tank can be a concerning sight, signaling potential issues with water quality and posing risks to your health. Whether it’s a small appliance reservoir, an RV fresh water tank, or a larger home storage unit, addressing mold quickly and effectively is crucial for maintaining a safe and clean water supply. This comprehensive DIY guide will walk you through the entire process, from understanding why mold forms to selecting the right cleaning agents and executing a thorough, safe cleaning regimen, ensuring your water tank is spotless and your water is pristine.
Understanding Mold in Your Water Tank
Mold, a common fungus, thrives in damp, dark environments, making water tanks ideal breeding grounds if conditions are right. It can appear as black, green, pink, or even white patches, often accompanied by a musty odor or a slimy texture on surfaces. Its presence indicates organic material buildup and can lead to unpleasant tastes and smells in your water, potentially impacting your health if the water is consumed or used for hygiene. Beyond aesthetics, mold can harbor bacteria and other microorganisms, compromising the overall quality and safety of your stored water. Regular cleaning is therefore not just about appearances, but about safeguarding your health and prolonging the life of your water storage system.
Types of Water Tanks and Their Cleaning Considerations
Different water tanks present unique cleaning challenges due to their size, access points, and typical usage. Understanding these variations helps tailor your cleaning approach for maximum effectiveness and safety.
Small Capacity Tanks (e.g., Humidifiers, Coffee Machines)
|
Our Picks for the Best Standing garment steamer in 2026
As an Amazon Associate I earn from qualifying purchases.
|
||
| Num | Product | Action |
|---|---|---|
| 1 | True & Tidy Heavy Duty Commercial Full Size Standing Garment Steamer for Clothes with Extra Large 3L (101 oz) Water Tank for 90+ mins of Steam Time, 1800 watts of Powerful Steam, 3 Settings, Gray |

|
| 2 | Pure Enrichment PureSteam XL Standing Fabric Steamer - Professional Wrinkle Remover Heats in 45 Seconds; 1/2-Gallon Tank for 1 Hour of Steaming; Easy-Roll Wheels, Garment Hanger, & Fabric Brush |
|
| 3 | Upright Steamer for Clothes 1350W Turbo Boiler Standing Garment Steamer 1.6L Water Tank 1h Continuous Steam Flat&Hanging Ironing Double Retractable Rod 10 Modes 30s Fast Preheat for all Fabrics |
|
| 4 | SALAV GS18-DJ Standing Garment Steamer with Roll Wheels for Easy Movement, 1.8L Water Tank for 1 Hour Continuous Steaming, Adjustable Pole for Storage, Includes Descaler Packet, 1500 watts |
|
| 5 | SALAV Heavy Duty Commercial Full-Size Garment Steamer with Foot Pedals and Extra Large 3L (101.5 oz) Water Tank, 1800 watts of Poweful Steam (Navy) |
|
| 6 | Garment Steamer for Clothes Standing, 1500W Efficient Clothes Steamer Standing with Wheels, Professional 58OZ Water Tank for Continuous Steaming, Fast Heating Wrinkle Remover |
|
| 7 | SALAV Heavy Duty Commercial Full-Size Garment Steamer with Foot Pedals and Extra Large 3L (101.5 oz) Water Tank, 1800 watts, 90+min of Continuous Steam (White) |
|
| 8 | SALAV® Heavy Duty Smart Auto Shut-off Commercial Full-Size Garment Steamer, Beeping Alert when Water Runs out, Foot Pedal Control, XL 3L (101.5 oz) Tank, 1800 watts, 90+min of Continuous Steam, Navy |
|
| 9 | Jiffy Steamer J-2000 Jiffy Garment Steamer with Plastic Steam Head, 120 Volt, Beige |
|
| 10 | SALAV GS18 Full-Size Clothes Steamer - 1500W Power, 1.8L Water Tank, 60-Min Garment Steam, Iron Clothing, Adjustable Pole & Wheels for Easy Storage, Professional Standing Steamer for Clothes, White |
|
Smaller tanks, often found in household appliances, are typically easier to disassemble and clean manually. Their limited size means they can be submerged or easily scrubbed by hand. However, the frequent exposure to warm, stagnant water in these appliances can lead to rapid mold growth, necessitating more regular cleaning. The focus here is on thorough manual scrubbing and rinsing, often with mild detergents or natural solutions like vinegar.
Medium to Large Capacity Tanks (e.g., RVs, Rain Barrels, Well Tanks)
These tanks, ranging from a few dozen to several thousand gallons, demand a more robust cleaning strategy. RV fresh water tanks often have limited access ports, requiring long-handled brushes and the “sloshing” method (driving the RV to agitate the cleaning solution). Rainwater harvesting tanks and well tanks can accumulate significant sediment in addition to mold, making powerful rinsing tools like pressure washers valuable. Due to their size, internal access is often restricted and should never be attempted without professional confined space training and equipment. Safety during draining and disposal of cleaning solutions is paramount for these larger volumes.
Comparison of Popular DIY Mold Cleaning Methods for Water Tanks
Choosing the right cleaning agent is critical for effective and safe mold removal. Here’s a comparison of common DIY options:
| Method | Effectiveness Against Mold | Safety Concerns | Best Use Case | Pros | Cons |
|---|---|---|---|---|---|
| Household Bleach | High | Irritant, fumes, environmental impact if not diluted/disposed properly, corrosive to some metals | Sterilization, killing established mold, non-porous surfaces | Highly effective disinfectant, readily available, inexpensive | Requires thorough rinsing, can degrade rubber/plastic over time, not septic-safe in large quantities |
| White Vinegar | Moderate | Mild irritant, strong odor | Mild mold growth, odor removal, general sanitizing | Natural, non-toxic, safe for septic systems, less harsh | May require longer dwell times, less effective on heavy mold |
| Hydrogen Peroxide | Moderate to High | Skin/eye irritant, can bleach surfaces | Mild to moderate mold, non-toxic alternative to bleach | Oxidizes mold, decomposes into water and oxygen, no harsh fumes | Can be less stable, may require higher concentrations for tough mold |
| Laundry Detergent/Mild Soap | Low (Cleaning only) | Mild irritant, residues if not rinsed properly | Initial scrubbing to remove loose debris, general cleaning | Safe, good for mechanical removal, cuts through grime | Does not kill mold or disinfect, requires follow-up with disinfectant |
| Baking Soda | Low (Abrasive only) | None | Stubborn stains, odor absorption, gentle abrasive | Natural, non-toxic, deodorizes, gentle abrasive | Not a disinfectant, primarily for scrubbing assistance |
Your DIY Guide to Safely Cleaning a Moldy Water Tank
Cleaning a moldy water tank requires a systematic approach, prioritizing safety and thoroughness.
Initial Assessment and Preparation
Before you begin, understand the scale of the problem and prepare your workspace.
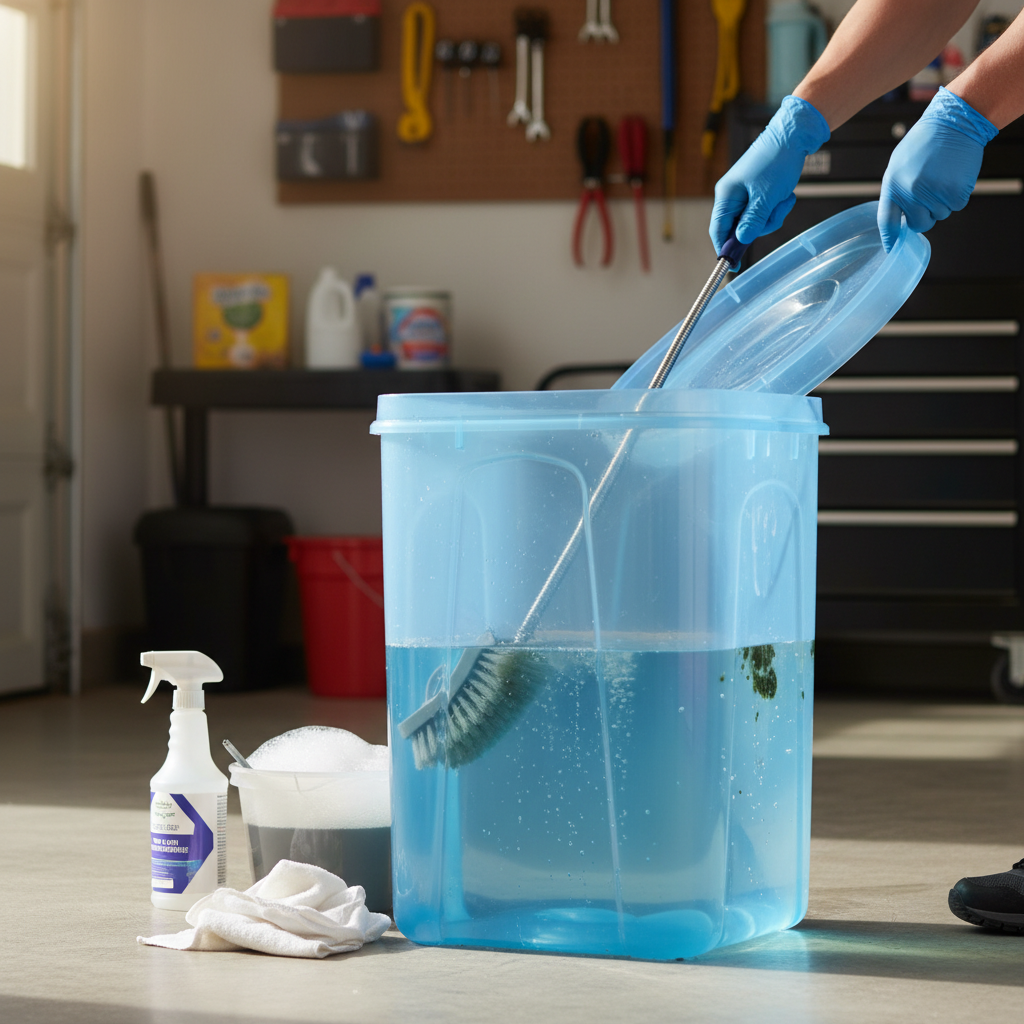
- Safety First: Don appropriate personal protective equipment (PPE), including rubber gloves and safety goggles, to protect against cleaning agents and mold spores. Ensure adequate ventilation, especially if working in an enclosed space.
- Drain the Tank: Completely empty the water tank. If your tank has a dedicated washout valve at the bottom, use it. Otherwise, open the main outlet valve. For larger tanks, use a hose to direct the water away from vegetation, lakes, or areas that could experience flooding or erosion. For residual water, use a wet/dry vacuum, scoop it out with a bucket and plastic cup, or use towels to absorb small amounts.
- Gather Your Tools: Collect a non-metallic bristle brush (preferably with a long, adjustable handle for hard-to-reach areas), a power washer (optional, but highly effective for larger tanks), laundry detergent or mild liquid soap, baking soda for tough spots, and your chosen disinfectant (household bleach or hydrogen peroxide).
Choosing the Right Cleaning Agent
Your choice of cleaning agent depends on the severity of the mold and the type of tank.
- For General Cleaning and Light Mold: A mixture of hot water and laundry detergent or mild liquid soap is effective for initial scrubbing to remove slime and sludge.
- For Stubborn Mold and Disinfection:
- Household Bleach (5-6% Sodium Hypochlorite): This is a highly effective disinfectant for non-porous surfaces like plastic water tanks. It kills mold and bacteria. The recommended dilution for disinfection is typically 1 ounce of household bleach (5.25% strength) per 60 gallons of water, or 0.5 milliliters per 1 gallon for potable water tanks. For more aggressive cleaning, a 50 ppm solution (e.g., 1 gallon of 5% bleach for a 1,000-gallon tank) can be used.
- Hydrogen Peroxide (3% Residential Dilution): A good alternative for those avoiding bleach, especially for toilet tanks connected to septic systems. It’s effective against pathogens if allowed to stay wet on the surface for at least 10 minutes.
- White Vinegar: While less potent than bleach for killing mold spores, vinegar is excellent for breaking down mineral deposits and mild mold, and it’s safe for various tank materials. It’s also a natural deodorizer.
The Step-by-Step Cleaning Process
Once prepared, follow these steps to deep clean your water tank:
- Initial Scrubbing: Apply your cleaning solution (hot water and detergent) to the interior surfaces of the tank. Use your bristle brush to scrub vigorously, paying close attention to corners, joints, and any visible mold or slime. For extremely dirty walls, sprinkle baking soda directly onto the surfaces to act as a gentle abrasive.
- Power Washing (Optional): If you have a power washer, it can significantly speed up the cleaning process for larger tanks. Fill it with water or a cleaning solution and use it to blast away stubborn grime. Hold the nozzle about four feet away initially, then move closer, aiming at a 45-degree angle to the tank wall. Always wear safety goggles when operating a pressure washer.
- Thorough Rinsing: This is a critical step. After scrubbing, rinse the tank thoroughly with a hose or a power washer filled with clean water. The goal is to remove all detergent, mold residue, and loose sediment. Fill the tank with hot water, let it stand for several hours, then drain and repeat the process until the water is completely clear and free of suds.
- Remove Remaining Liquids and Residue: Use a wet/dry vacuum to extract any remaining rinse water or debris from the bottom of the tank. For small amounts, a clean rag or mop head can be used.
- Flush Hoses and Pipes: Don’t forget the distribution system. Pour some cleaning solution into your tank’s hoses and pipes, then use your water pump to circulate it through the system. Follow this with a thorough flush of clean water until all detergent is gone.
- Disinfection (for Potable Water Tanks):
- Fill the tank three-quarters full with clean water.
- Add the appropriate amount of household bleach (e.g., 1 gallon of 5% bleach for a 1,000-gallon tank).
- Fill the tank completely with clean water to ensure thorough mixing.
- Let the bleach solution sit in the tank for at least 30 minutes, but ideally 8-24 hours for severe mold issues. Ensure no one comes into contact with the solution during this time.
- Periodically check chlorine levels with testing strips; if no chlorine is detected, repeat the bleach addition and waiting period.
- Final Rinsing and Testing: After disinfection, completely drain the tank, again directing the chlorinated water away from sensitive areas. Rinse the tank multiple times with fresh water until no bleach odor is detectable. For potable water tanks, consider performing a water quality test for E. coli, total coliform bacteria, and residual chlorine levels to confirm the cleaning was successful and the water is safe for use.
Common Mistakes to Avoid When Cleaning a Moldy Water Tank
- Entering the Tank: Never enter a large water tank without proper confined space training, equipment, and a safety observer. It’s extremely hazardous.
- Insufficient Rinsing: Failing to thoroughly rinse the tank after using cleaning agents can leave harmful chemical residues in your water supply.
- Ignoring Hoses and Pipes: Mold and bacteria can linger in the plumbing connected to the tank, leading to recontamination if not flushed.
- Using Abrasive Materials: Avoid steel brushes or abrasive sponges on plastic tanks, as they can scratch the surface, creating new hiding spots for mold.
- Improper Disposal of Drained Water: Cleaning solutions, especially bleach, can harm plants, animals, and water bodies if not diluted or disposed of responsibly.
- Neglecting Safety Gear: Always wear gloves and eye protection to prevent chemical exposure and irritation.
Maintaining a Clean Water Tank and Preventing Future Mold
Regular maintenance is key to keeping your water tank mold-free and ensuring a continuous supply of clean water.
Best Practices for Ongoing Water Tank Hygiene
- Use Potable Water Only: For tanks designed for drinking water, only fill with water from a safe, treated source.
- Limit Stagnation: If possible, keep water circulating or ensure tanks are not left with stagnant water for extended periods, especially in warm climates.
- Install Filters: Use filters at the inlet to prevent sediment and larger organic matter from entering the tank.
- Control Sunlight: If your tank is translucent or light-colored, try to keep it out of direct sunlight, as UV light promotes algae growth, which then provides food for mold. Darker tanks or shaded locations require less frequent cleaning.
- Proper Ventilation: For indoor tanks or those with sealed access, ensure there’s some ventilation to prevent condensation buildup that can lead to mold.
Regular Inspections and Cleaning Schedules
Establish a routine for inspecting and cleaning your water tank.
- Annual Cleaning: Most water tanks, especially those storing potable water, should be cleaned at least once a year.
- Increased Frequency: Consider more frequent cleaning (every 6 months or quarterly) if your tank is exposed to direct sunlight, located in a warm climate, or if you’ve noticed recurring mold issues.
- Visual Checks: Regularly inspect the interior walls of your tank for any signs of algae, biofilm, or mold. Check water for changes in taste or odor.
Troubleshooting Persistent Mold Issues
If mold consistently returns despite thorough cleaning, consider these factors:
- Source Water Quality: The problem might stem from your water source. Test your well water or municipal supply for contaminants.
- Tank Material Degradation: Older plastic tanks can develop micro-scratches or become porous over time, making them harder to clean effectively.
- Systemic Contamination: Mold might be present in other parts of your water system (pipes, pumps, filters). A professional evaluation might be necessary.
- Inadequate Disinfection: Ensure you are using the correct concentration of disinfectant and allowing sufficient dwell time. Repeat disinfection if tests show continued contamination.
“Regular maintenance is not just about keeping things clean; it’s about proactively safeguarding your investment and your health. Never underestimate the power of a consistent cleaning schedule for your water storage.” – Alek Eccles, Technical Writer and Content Creator, NTO Tank
In conclusion, a moldy water tank is a problem that requires immediate and diligent attention. By following this comprehensive DIY guide, you can safely and effectively eradicate mold, disinfect your tank, and restore the integrity of your water supply. Remember to prioritize safety, choose the right cleaning agents for your specific tank, and commit to regular maintenance to prevent future mold growth. A clean water tank is fundamental to clean, safe water.
Do you regularly check your water tank for signs of mold, or do you wait until an issue arises?
Frequently Asked Questions
Is it safe to drink water from a tank that had mold after cleaning it?
Yes, if the tank has been thoroughly cleaned, disinfected with an appropriate agent like bleach, extensively rinsed to remove all chemical residues, and ideally tested for bacteria and safe chlorine levels, the water should be safe for consumption.
What causes mold to grow in a water tank?
Mold typically grows in water tanks due to the presence of moisture, warmth, darkness, and a food source (such as sediment, organic debris, or algae). Stagnant water and inadequate ventilation can also contribute to its growth.
Can I use vinegar instead of bleach to clean a moldy water tank?
While vinegar can kill some types of mold and is a good natural cleaner, it is generally less effective than household bleach for thorough disinfection, especially for heavy mold growth or bacterial contamination in potable water tanks. You may need to use higher concentrations and longer dwell times with vinegar.
How often should I clean my water tank to prevent mold?
It is recommended to clean your water tank at least once a year. However, if your tank is exposed to direct sunlight, located in a warm climate, or if you’ve previously experienced rapid mold growth, you may need to clean it more frequently, such as every six months.
What safety precautions should I take when cleaning a moldy water tank?
Always wear rubber gloves and safety goggles. Ensure good ventilation, especially if using bleach or other strong chemicals. Never enter large water tanks, as they are considered confined spaces and can be hazardous. Be mindful of where you drain cleaning solutions to avoid environmental damage.